Tag Archives: arduino

Paparazzi Flashes

For last Saturday’s Oscar-themed prom, two of my students wanted to make a cardboard wall of photographers. Essentially, a collection of randomly-firing bulb flashes placed on a piece of cardboard.

image

After experimenting with the capacitor-driven flash units of couple disposable cameras and recognizing they would be too dangerous, we settled on the use of some high-intensity LEDs we took off a string of holiday lights. We decided to use Arduino as our microcontroller platform. To simplify construction, each LED was wired to one pin, with the grounds soldered together.

image

In testing, these LEDs were receiving about 4.4 V (rms) from their main supply (220 V), so we figured they could handle the Arduino’s 5 V for a short duration without damage. Three of the LEDs together made a light source too bright to look at directly, and that passed for a flash in the interior setting of the prom. Thus, for 8 “cameras” we needed 24 LEDs, and thus two Arduinos.

image

A former student, currently studying computer science, wrote up the straightforward Arduino script. We considered drawing a random number (0 to 3) to choose which set of 3 LEDs to light, and another random number (0 to 2000) to determine the delay between flashes, but a constant flash interval of 1 second looked better. Indeed, it looked quite good, and after 2 hours of stripping wire and soldering connections, the students were justifiably proud of their work.

N European Proximty Sensor

I put together this little bit of electronics for an upcoming art show. My goal was to create a device that would demonstrate the Northern European need for personal space. It sounds an alarm when someone gets too close.

I will put a video of the device in action here.

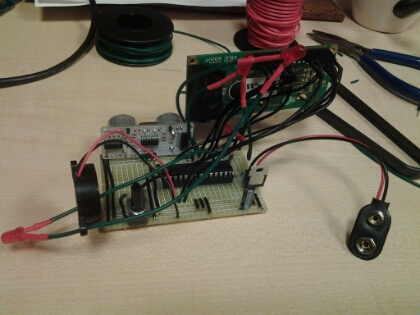
The prototype was built on a breadboard and powered by an Arduino Uno. Once I had everything wired up and the programming more-or-less finished, I built the enclosure from a plastic box that was lying around. I cut holes for the various components, making sure they would fit together on the inside.

image

Those components include ultrasonic distance sensor, which I got from Radio Shack. It works like a charm.

image

The heart of the device is an ATMega 328, which is a great chip. Since I ran out of capacitors, I had to figure out how to get the chip to run with the inaccurate internal timer. To do this, I used two Arduinos: the first acted as a serial programmer to install an internal-timer bootloader on the ATMega 328 in the second. With the correct bootloader, everything proceeds as expected (recalling, of course, to select the internal timer bootloader when uploading from the Arduino IDE).

image

When the device measures a distance less than X to a person, it does three things. First, it displays a message on an LCD screen, depending on X. Next, it flashes either two or four red LEDSs. Lastly, it makes one of two pitches of sound from a piezoelectric cell. Here are those components, wired up.

image

The device is powered by a 9V battery, so I use a regulator to reduce to 5V. There are also a couple capacitors and a power switch — all good practice but maybe unnecessary.

image

Looks Like Chaos

We had an art festival this month, and my students encouraged me to submit a piece. The theme was “Inside my Mind”, so I thought about how I could represent the near-incomprehensibility emergent nature of human thought.

2014-01-26 15.27.32

I decided to build an electronic device that would carry a nearly-random signal to a computer display. The screen displayed coloured lines that, if looked at individually, would appear to be changing colour randomly. However, if you sit back and take in the whole screen, patterns — both recurring and transient — begin to emerge. In the still image above, the monitor on the left is displaying the output (along with a pesky dialogue box in the middle of the screen).

To build this, I used an Arduino that was programmed to output a signal via a VGA cable. The Arduino’s 16 MHz clock speed isn’t fast enough to output a signal pixel-by-pixel, but by counting cycles (the “nop”s in the code below) I was able to get close enough that the signal could be interpreted and displayed by a monitor.

The code is below. I enjoyed this project, and learned a lot about timing in microcontrollers, but wouldn’t recommend it to anyone else, as much of the time is spent fine-tuning the timings.

#include <avr/io.h>
#define VSYNC_LOW    PORTD &= ~_BV(6)
#define VSYNC_HIGH   PORTD |= _BV(6)
#define HSYNC_LOW    PORTD &= ~_BV(7)
#define HSYNC_HIGH   PORTD |= _BV(7)
void setup() {
}
void loop() {
int i = 0;
cli();
DDRB = 0xFF;
DDRD = 0xFF;
byte noise = B00001100;
//Loop Over-And-Over Again
  while(1){
      // Vertical Data
      i=0;
      while(i < 600){
            //2.2uS Back Porch
          byte noise = byte(micros());
          noise &= B00011100;
          __asm__(“nop\n\t””nop\n\t””nop\n\t””nop\n\t””nop\n\t””nop\n\t””nop\n\t””nop\n\t”);
          __asm__(“nop\n\t”);
            //20uS Color Data
          PORTB ^= noise;
          delayMicroseconds(19);
          __asm__(“nop\n\t””nop\n\t””nop\n\t””nop\n\t””nop\n\t””nop\n\t””nop\n\t””nop\n\t”);
          __asm__(“nop\n\t””nop\n\t”);
          PORTB ^= B00000000;
            //1uS Front Porch
          __asm__(“nop\n\t””nop\n\t””nop\n\t””nop\n\t””nop\n\t””nop\n\t””nop\n\t””nop\n\t”);
          __asm__(“nop\n\t””nop\n\t””nop\n\t””nop\n\t””nop\n\t””nop\n\t””nop\n\t””nop\n\t”);
            //3.2uS Horizontal Sync
          HSYNC_HIGH;
          delayMicroseconds(3);
          __asm__(“nop\n\t””nop\n\t”);
          HSYNC_LOW;
          i++;
      }
      // Vertical Porch
      while(i < 1){
          delayMicroseconds(2);
          __asm__(“nop\n\t””nop\n\t””nop\n\t””nop\n\t””nop\n\t””nop\n\t”);
            //20uS Color Data
          delayMicroseconds(20);// 20uS
            //1uS Front Porch
          delayMicroseconds(1); // 1uS
            //HSYNC for 3.2uS
          HSYNC_HIGH;
          delayMicroseconds(3);
          __asm__(“nop\n\t””nop\n\t”);
          HSYNC_LOW;
          i++;
      }
      // Vertical Sync
      i=0;
      VSYNC_HIGH;
      while(i<4){
            //2.2uS Back Porch
          delayMicroseconds(2);
          __asm__(“nop\n\t””nop\n\t””nop\n\t””nop\n\t””nop\n\t””nop\n\t”);
            //20 uS Of Color Data
          delayMicroseconds(20);// 20uS
            //1uS Front Porch
          delayMicroseconds(1); // 1uS
            //HSYNC for 3.2uS
          HSYNC_HIGH;
          delayMicroseconds(3);
          __asm__(“nop\n\t””nop\n\t”);
          HSYNC_LOW;
          i++;
      }
      VSYNC_LOW;
      i=0;
      while(i < 22){
            //2.2uS Back Porch
          delayMicroseconds(2);
          __asm__(“nop\n\t””nop\n\t””nop\n\t””nop\n\t””nop\n\t””nop\n\t”);
            //20uS Color Data
          delayMicroseconds(20);// 20uS
            //1uS Front Porch
          delayMicroseconds(1); // 1uS
            //HSYNC for 3.2uS
          HSYNC_HIGH;
          delayMicroseconds(3);
          __asm__(“nop\n\t””nop\n\t”);
          HSYNC_LOW;
          i++;
      }
  }
}

Gadget: Infinite Monkey

The Infinite Monkey Theorem [IMT] states that a sufficiently-large number of monkeys, randomly hitting keys on typewriters, will eventually reproduce the works of Shakespeare. It’s an “order hidden in chaos” claim as old as history. Let’s ignore the problems with using monkeys (ie: intelligence, low output, boredom, etc).

Mathematically, the IMT relies on the monkeys providing a random string of characters. The likelihood of a given string corresponding to a known text (ie: Shakespeare) is very, very small — but not infinitesimal. Thus, if you wait long enough, the probability will grow until you can be reasonably confident a certain string will be produced (however, after no amount of time can you be 100% sure — just as after no number of coin flips can you be completely sure you’ve gotten at least one tail).

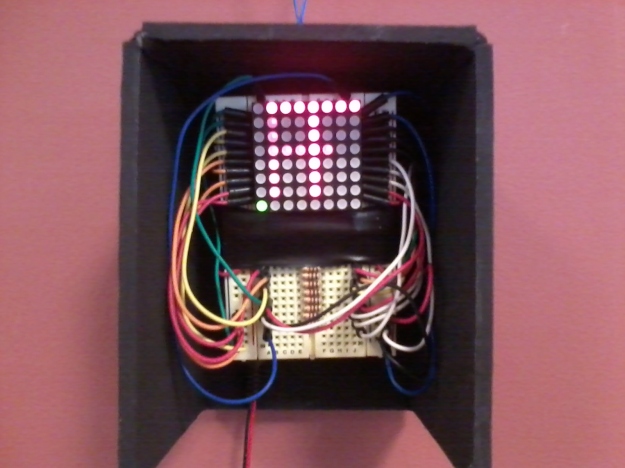
What I find interesting, and overlooked by most people who hear about the IMT, is how quickly the numbers grow. To bring these issues to light, I used an Arduino and an 8×8 LED matrix to simulate a monkey. 5 times per second, a letter is randomly chosen and drawn. If the string of letters matches the string “TOBEORNOTTOBE” (“to be or not to be”, the display pauses and green LEDs at the bottom of the display indicate the number of letters in the string that match.

2014-01-03 10.47.57

In the above image, the letter T has just appeared, and the single green LED signals that there is a one-letter match. You’d need to wait an one hour (on average) in order to see the string “TOB”, and about a day (on average) to see “TOBE”.

The 19-character string, “TOBEORNOTTOBE” will come along on average once every 10 000 million million years, or a million times longer than the age of the universe.

The full text of Hamlet will take a bit longer.